Taeseunglee's Blog


Monday, June 19, 2017

Windows Subsystem for Linux(WSL) - Bash로 윈도우 탐색 & Update ubuntu Linux version

이번 포스팅에서는 WSL을 사용하기 전에 "실제로 이게 되려나..." 라는 생각이 있던 것들에 대해 해결해보도록 하겠습니다. 이를 위해, WSL에 있는 Bash로 명령어를 사용해보고, 윈도우를 탐색해보는 시간을 갖겠습니다.

1. WSL에 대해 알아보기
내 쉘은 Bash!

Add caption


2. C 프로그래밍을 할 수 있다~
vim이 진짜 되는지 궁금했어요..

gcc도 되는지 확인.


3. 진짜 Linux 절대 경로와 똑같이 나오는지 궁금해서 출력해봤습니다.
절대 경로 출력!


4. WSL 개요에서, /mnt에 드라이브들이 mount되어있다고 했다는 것을 확인하기 위한 스샷.
/mnt에 있는 C 드라이브. Windows 시스템을 볼 수 있다.


5. Desktop에서 어떻게 작업하죠?
여기! (제 Desktop, 바탕화면 위치)


6. Ubuntu 버전이 16인데 왜 14를 쓰고 있죠?!
처음 Ubuntu 버전

잘가 14.04...


업데이트 후 Ubuntu 버전

7. 윈도우와 Linux는 개행이 다른데.... notepad와 vim에서 실험을 해보도록 하겠습니다.


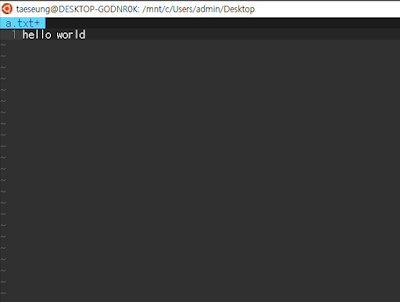
Vim에서 hello world작성


notepad에서 확인해보기!
실험을 해본 결과, vim에서 작성한 것은 notepad로 여는 것은 아직은 별로라고 생각됩니다.
그냥 bash에서 notepad 명령어로 notepad를 여는 것이 좋아보입니다. 그렇지만,

띠용. polaris office에서 열었을 때 결과.
- 깔끔 -


위의 과정들을 통해서, WSL의 bash를 쓰기 전에 궁금했던 점들을 명령어를 사용해보고, 윈도우를 탐색해 봄으로써 해결해봤습니다.

Friday, June 16, 2017

Windows Subsystem for Linux(WSL) - 설치 방법

이번 포스팅에서는 Windows에 WSL을 어떻게 설치할 수 있는지 알아보도록 하겠습니다.

Prerequisites

  • Windows 10(Os build 14393.0, i.e. version 1607이상)
  • 인터넷
  • 시간(Os build가 14393보다 낮은 경우에는 정말 많은 시간을 소모하실지도 모릅니다)
Windows Os build는 설정 > 시스템 > 정보 에서 볼 수 있습니다.
만약 Os build가 14393이하라면, 업데이트를 하셔야합니다. 최근 Os build는 15063(version 1703)이므로, 15063으로 업데이트하시는 것을 권장합니다. (bash shell을 이용할 때, 24-bit color를 지원합니다. )


Installation

WSL/Bash를 설치하기 위해서는 다음의 2 단계가 필요합니다.

1. 설정 > 업데이트 및 복구 -> 개발자용 을 엽니다.
하지만, 이 단계도 os build >= 16215부터는 필요없어집니다.(https://blogs.msdn.microsoft.com/commandline/2017/06/08/developer-mode-no-longer-required-for-windows-subsystem-for-linux/ , build 2017에서 발표함.)


2. Linux용 Windows 하위시스템 기능을 켜기

제어판 > 모든 제어판 항목 > 프로그램 및 기능 > Windows 기능 켜기/끄기 -> Linux 용 WIndows 하위 시스템(베타) 키면 됩니다.


또는, power shell 프롬프트를 관리자 모드로 열고, 실행합니다.

Enable-WindowsOptionalFeature -Online -FeatureName Microsoft-Windows-Subsystem-Linux


그리고 다시 시작을 합니다!


Run Bash on Windows


1. command prompt를 엽니다.
2. bash를 입력합니다.
3. y를 입력합니다.


Create a Unix user

아이디와 비밀번호를 입력해서 새로운 유닉스 유저를 만듭니다.


참고 자료

Windows Subsystem for Linux(WSL) - 개요

Windows Subsystem for Linux(WSL) Overview

WSL에 대한 블로그 활동은 Microsoft Student Partner Evangelism 활동으로 하는 것임을 밝힙니다.

이 글을 읽으실 때, 영어 단어 빼면 조사만 남네~ 하실 수 있겠지만, 개념들을 억지로 번역하는 것이 오히려 더 이해하기 어렵다고 판단되어 필요한 영어 개념은 그대로 영어로 썼습니다. (ㅠㅠ)

Windows Subsystem for Linux(WSL)은 Microsoft사와 Canonical사가 합작(partnered together) 만든 것으로, Linux 프로그램을 실행시킬 수 있는 호환성 계층(Compatible Layer)입니다. 호환성 계층이란, host system의 것이 아닌 프로그램을 host system에서 실행할 수 있게 하는 것입니다. 예를 들면, Wine이라는 Compatible Layer는 Microsoft Windows 프로그램을 Unix 계열 시스템에서 실행할 수 있게 하는 것입니다.

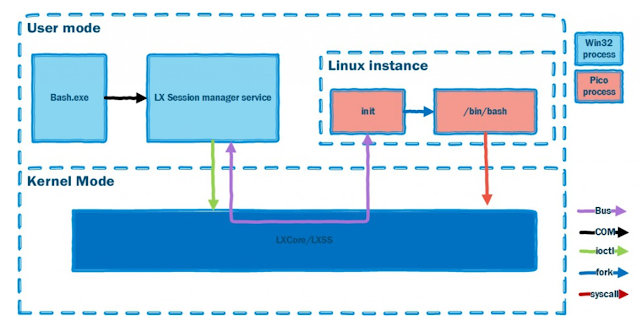
WSL의 구조는 다음의 것들로 구성되어있습니다:
  1. User mode session manager - Linux instance의 Life cycle(Linux instance가 시작할 때부터 끝날때까지)를 관리함.
  2. Pico provider drivers (lxss.sys, lxcore.sys) - Linux system call들을 호스트인 Window에 맞게 번역(translate)함으로써 Linux kernel을 구동함(emulate).
  3. Pico processes - native unmodified Linux를 관리(host)함. (Windows kernel에서 Linux System call들을 바로 사용할 수 있게 한다.)

그림. WSL 구성 (출처: msdn blog)


추가적으로, WSL에서 File system을 이용하여 Windows의 파일과 drive를 상호 운용성(interoperability)를 얻습니다. msdn blog 에 들어가면 WSL의 파일시스템에 관한 정보를 얻을 수 있습니다.


한편으로, WSL에서는 기본적으로 Bash shell을 지원해준다. 또한, WSL은 Virtual Machine을 따로 필요하지 않고, Windows 위에서 대부분의 리눅스 명령어를 지원해줍니다.
Windows 10 bash shell에서 htop 명령어를 입력한 화면.


WSL 기능

WSL은 다음과 같은 것을 가능하게 합니다:

  1. grep, sed, awk 등 command-line utilities들을 사용할 수 있다.
  2. 리눅스 호환 파일시스템(Linux-compatible filesystem)과 구조를 사용할 수 있다.
  3. 윈도우 저장소는 /mnt/... (예를 들어, c드라이브는 /mnt/c)에 마운트(mount)되어 있으며, 이를 접근할 수 있다.
  4. Bash shell 스크립트와 Linux command-line 프로그램을 실행할 수 있다. 
    1. 툴: vim, emacs, tmux
    2. 언어: Javascript/node.js, Ruby, Python, C/C++, C#, F#, Rust, Go 등
    3. 서비스: sshd, MySQL, Apache, lighttpd
  5. apt를 이용하여 리눅스 툴을 설치할 수 있다. (예를 들어, 깃을 설치하기 위해 sudo apt-get install git를 입력.)
  6. 윈도우 프로그램을 Bash shell에서 실행시킬 수 있다.
  7. 리눅스 프로그램을 윈도우에서 실행시킬 수 있다.
(https://blogs.msdn.microsoft.com/commandline/2017/04/11/windows-10-creators-update-whats-new-in-bashwsl-windows-console/ 에서 추가된 기능들을 볼 수 있습니다.)


다음에는 Windows Subsystem for Linux 설치 방법에 대해 포스팅하도록 하겠습니다.

참고자료

Friday, December 30, 2016

Fast GCD : Euclidean Algorithm and Binary GCD Algorithm

GCD Algorithm: Euclidean Algorithm and Binary GCD Algorithm

* Euclidean Algorithm
Wikipedia의 Procedure와 implementation을 이용해서 euclidean_gcd()를 만들었다. 이 함수는 다음과 같은 성질을 이용하여 만들어졌다.
gcd(a, b) = gcd(b, r0)  = gcd(r0, r1) where r= a%b and r1 = b % r0. 

아래는 각 알고리즘에 대한 코드입니다.

* Binary GCD
binary gcd는 Wikipedia에서 implementation에 있는 코드를 넣었습니다. procedure은 다음과 같습니다. (Wikipedia - Algorithm)
  1. gcd(0, v) = v, because everything divides zero, and v is the largest number that divides v. Similarly, gcd(u, 0) = u. gcd(0, 0) is not typically defined, but it is convenient to set gcd(0, 0) = 0.
  2. If u and v are both even, then gcd(uv) = 2·gcd(u/2, v/2), because 2 is a common divisor.
  3. If u is even and v is odd, then gcd(uv) = gcd(u/2, v), because 2 is not a common divisor. Similarly, if u is odd and v is even, then gcd(uv) = gcd(uv/2).
  4. If u and v are both odd, and u ≥ v, then gcd(uv) = gcd((u − v)/2, v). If both are odd and u < v, then gcd(uv) = gcd((v − u)/2, u). These are combinations of one step of the simple Euclidean algorithm, which uses subtraction at each step, and an application of step 3 above. The division by 2 results in an integer because the difference of two odd numbers is even.[3]
  5. Repeat steps 2–4 until u = v, or (one more step) until u = 0. In either case, the GCD is 2kv, where k is the number of common factors of 2 found in step 2.
Wikipedia에 설명이 잘 되어있고 code에 주석이 잘 달려있어 특별한 수정을 하지 않은 채로 코드를 작성하였습니다.
그리고 구글링을 하다가 Daniel Lemire's blog(밑의 3번 link 참조)에서 성능이 더 좋다고 하는 코드도 가져왔습니다. 이 블로그에 있는 코드 Algorithm은 Wikipedia의 implementation code와 같으나, 블로그 코드에서 숫자에 있는 2^k factor를 제거하는 부분은 __builtin_ctz() 함수를 사용하였습니다. __builtin_ctz()는 gcc standard C library에 있는 built-in, optimized function이다. 다음은 __builtin_ctz에 대한 설명입니다.(4, 5번 reference link 참조)

— Built-in Function: int __builtin_ctz (unsigned int x)
Returns the number of trailing 0-bits in x, starting at the least significant bit position. If x is 0, the result is undefined.


Reference

Tuesday, December 27, 2016

Sudoku problem(9x9) solved using Backtracking Algorithm

이번 post에서는 sudoku problem(9x9)을 Backtracking Algorithm을 통해 푸는 방법에 대해서 post하겠습니다.

Wikipedia에서 Backtracking Algorithm이 어떤 방식으로 진행되는지 나와있습니다. (Description of method)
The backtracking algorithm enumerates a set of partial candidates that, in principle, could be completed in various ways to give all the possible solutions to the given problem. The completion is done incrementally, by a sequence of candidate extension steps.
The backtracking algorithm traverses this search tree recursively, from the root down, in depth-first order. At each node c, the algorithm checks whether c can be completed to a valid solution. If it cannot, the whole sub-tree rooted at c is skipped (pruned). Otherwise, the algorithm (1) checks whether c itself is a valid solution, and if so reports it to the user; and (2) recursively enumerates all sub-trees of c. The two tests and the children of each node are defined by user-given procedures.
Therefore, the actual search tree that is traversed by the algorithm is only a part of the potential tree. The total cost of the algorithm is the number of nodes of the actual tree times the cost of obtaining and processing each node. This fact should be considered when choosing the potential search tree and implementing the pruning test.

중요한 문장들로만 정리하자면, backtrace method는

  1. The backtracking algorithm traverses the search tree recursively, from the root down, in depth-first order. (root step)
  2. If a node c is an invalid solution, the whole subtree rooted at c is skipped(pruned). (reject step)
  3. If a node c is a valid and complete solution,  reports results to the user. (accept and output step)
  4. If a node c is a valid and incomplete solution, enumerates children of the tree. (candidate extension steps / first and next step)
accept step에 관해서는 Wikipedia에서 다음과 같이 설명한다.
It may assume that the partial candidate c and all its ancestors in the tree have passed the reject test.
여기서 각 step은 Wikipedia에서 pseudocode로 설명하는 step을 따왔습니다.

본격적으로 sudoku를 풀기 위해서 두 슬라이드를 가져왔습니다.
밑의 두 슬라이드는 see.standford.edu에서 CS106B의 Lecture 11의 일부분을 캡쳐한 것입니다.


위에서 설명한 backtracking의 방법대로 sudoku problem을 해결하는 C코드를 다음과 같이 작성하였습니다.


- Reference

  1. Wikipedia: https://en.wikipedia.org/wiki/Backtracking
  2. Slides: https://see.stanford.edu/materials/icspacs106b/Lecture11.pdf in https://see.stanford.edu/Course/CS106b

Saturday, December 10, 2016

Write Resume & Prepare for a for Software Engineering Interview Link

Original Text :


Translated to Korean :
(소프트웨어 엔지니어를 위한) 끝내주는 이력서를 쓰는 방법
(소프트웨어 엔지니어를 위한) 인터뷰 준비하기

구글 코리아 채용 설명회(20016.3.22) 기록 in Sogang Univ.

구글 코리아 채용 설명회에 간 이유는 Google internship에 대해 관심이 있어서 설명을 들으러 갔습니다.
이 기록은 9개월전에 있었던 구글 코리아 채용 설명회에 대한 메모를 바탕으로 쓴 글입니다. 메모는 전체 내용이 아닌 제가 관심 있는 내용을 적었습니다.
어떤 방식으로 포스팅을 할지 매우 고민했습니다. 문화와 사람에 관한 이야기는 제가 구글에 있어본 적이 없고, 무엇보다 그저 회사 홍보하는 느낌의 글로 변질될 것 같다고 판단되어 간략하게 하고 넘어갔습니다. 인터뷰 부분은 제가 중요하다고 생각되는 문장들만 간략하게 적었기 때문에, 문장 단위로 정리하는 방식으로 이 글을 썼습니다.


* Culture and People at Google

발표자분께서 구글이 구글러에 대한 대우, 구글내의 문화, 다양성 존중, 소수자 배려 등등에 관한 이야기를 했습니다. 이에 관해서는 밑의 링크나 Life at Google에서 더 자세히 알 수 있을 것 같으니 넘어가겠습니다.


* Software Engineer interview
(interview의 진행 방식은 youtube에 올라와 있고 밑에 링크가 있습니다.)

면접 태도에 관해서.
"인터뷰하는 도중에, 무엇을 질문하는 지 잘 모를 때에는 질문을 해야합니다. 질문 잘하는 것도 중요하고, 끝까지 열심히 하려고 (노력)하는 것도 중요하다."
"난 주어진 문제를 어떻게 풀 것이고, 무엇을 어떻게 사용할 것이고, 왜 그걸 사용하는지 그것에 대한 이야기를 해야합니다. 왜냐하면 interviewer가 interviewee의 생각을 아는 것이 중요하기 때문입니다."


기술 면접에 관해서.
"자료구조와 알고리즘 중요합니다."
"알고리즘이 있으니 complexity도 계산할 수 있어야합니다."
"complexity를 개선할 수 있다면 개선하세요."
"기술 면접을 whiteboard로 진행하기 때문에, whiteboard cording 연습해보는 것이 중요합니다. 여백 있는 것이 좋고, 설명 잘하는 것, 변수명 짓는 것도 중요합니다."
"인터뷰라고 생각하지말고, discussion이라고 생각하고 하세요."

whiteboard cording interview에 관해서, 다른 면접 후기에서는 Google Drive Document에 작성하면서 시험보기도 한다고 합니다. 여백에 대해서, 코드를 쓸 공간이 적으면, 화이트 보드가 난잡해지고 interviewer가 보기에 안좋다는 말을 들었습니다.


설명회에서 구글 지원에 관련하여 추천한 자료들

그리고 acmicpc.net / hackerrank.com / leetcode.com 같은 Online Judge에서 문제를 푸는 것이 좋다는 말도 들었습니다.

마지막으로 발표자께서 발표를 마치면서, 발표자분께서 다음과 같이 말씀해주셨습니다.
"Design your time."